Getting started with Depthonix
Follow these steps to install and start watching in 3D on your AR/XR glasses.
Recommended System Specs
Make sure your machine is ready before you start.

- ✓Apple Silicon (M2 or later)
- ✓macOS 14 Sonoma or newer
- ✓8 GB RAM or more
- ✓Glasses connected directly via USB-C / Thunderbolt (or stream the picture to an Android smartphone with USB-C DisplayPort Alt Mode via the Remote Screen feature if your machine cannot drive the glasses directly)
- ✓Any AR/XR glasses supporting SBS mode

- ✓Windows 10 (64-bit) version 2004 or newer, or Windows 11
- ✓NVIDIA or AMD GPU with at least 4 GB VRAM (for iGPU: AMD Radeon 890M / Ryzen Z2 Extreme or newer, or Intel Arc, with at least 4 GB shared memory recommended)
- ✓8 GB RAM or more (16 GB recommended if system RAM is shared with an onboard GPU)
- ✓USB-C (DP alt-mode), DisplayPort, or HDMI 2.0 or newer (or stream the picture to an Android smartphone with USB-C DisplayPort Alt Mode via the Remote Screen feature if your machine cannot drive the glasses directly)
- ✓Any AR/XR glasses supporting SBS mode
Tested AR/XR glasses
Models we've already verified working with Depthonix:
| Brand | Tested models |
|---|---|
| VITURE | Pro XRLuma ProLuma UltraBeastPro 2 XR |
| XREAL | Air 2OneOne Pro1Sxbx a01 |
| RayNeo | Air 2sAir 3sAir 3s Pro |
| Rokid | MaxMax 2 |
Depthonix is designed to work with virtually every AR/XR glasses model that supports a 3D or SBS mode — not just the ones listed here. If you've tested a model that isn't on the list, we'd love to hear about it — share it with us at support@depthonix.com
Free vs Trial vs Full License
Every account starts with a 7-day free trial of the complete experience.
FreeAfter the trial ends | Trial7 days · all features | Best valueFull License฿499 · one-time | |
|---|---|---|---|
| Max depth | 0.5× | Full 5.0× | Full 5.0× |
| Capture resolution | Up to 480p | Up to native | Up to native |
| Max fps | 30 fps | Unlimited | Unlimited |
| Scene presets | — | ✓ | ✓ |
| Motion Enhancement | — | ✓ | ✓ |
| Convert time | 5 min, then 5 min cooldown | Unlimited | Unlimited |
| Devices in use at once | 1 (unlimited transfers) | 1 (unlimited transfers) | 1 (unlimited transfers) |
| How long | Forever | 7 days | Forever · perpetual license |
Trial and Free features may change without notice (see the EULA).
Installation

macOS
- 1Download the .dmg from the download page and open it.
- 2Drag the Depthonix icon into your Applications folder.
- 3Open it for the first time — if you see "cannot verify developer", go to System Settings → Privacy & Security and click "Open Anyway".
- 4Grant Screen Recording permission when asked (required to capture the screen).

Windows
- 1Download the installer (.exe) from the download page and run it.
- 2If Windows shows a “Windows protected your PC” SmartScreen warning, click “More info” then “Run anyway” (see the note below).
- 3Accept the license agreement (EULA), pick an install location if you like, and finish the wizard.
- 4Launch Depthonix from the Start menu and sign in with your account — Windows needs no screen-recording permission.
Screen Recording permission (macOS)
Depthonix needs macOS Screen Recording permission to read your screen and convert it to 3D. It only reads the screen on your device — nothing is ever uploaded (see our Privacy Policy). You grant it once:
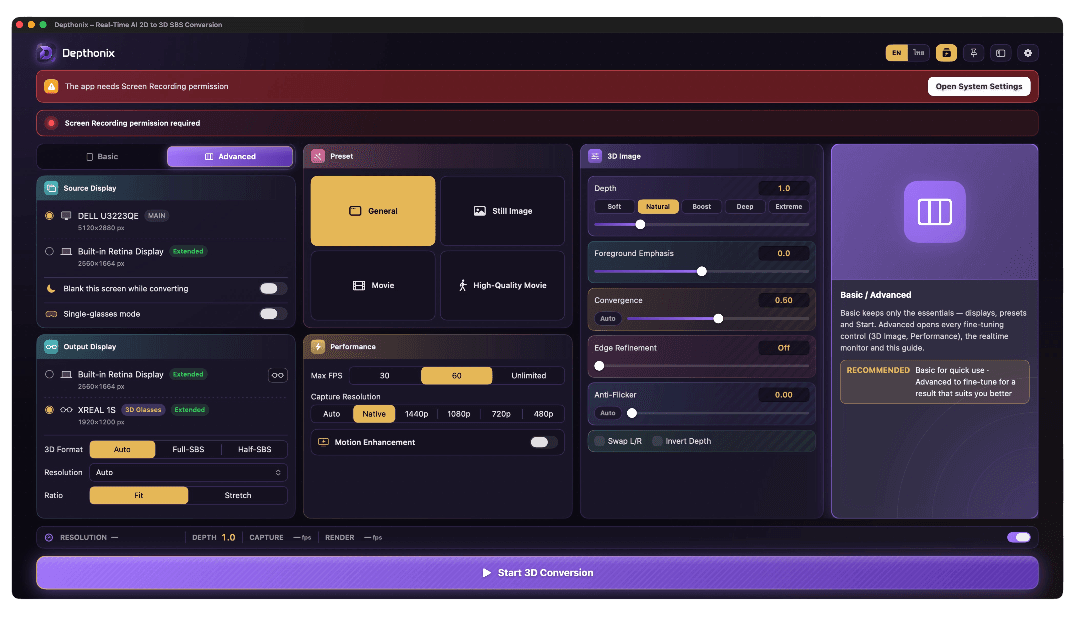
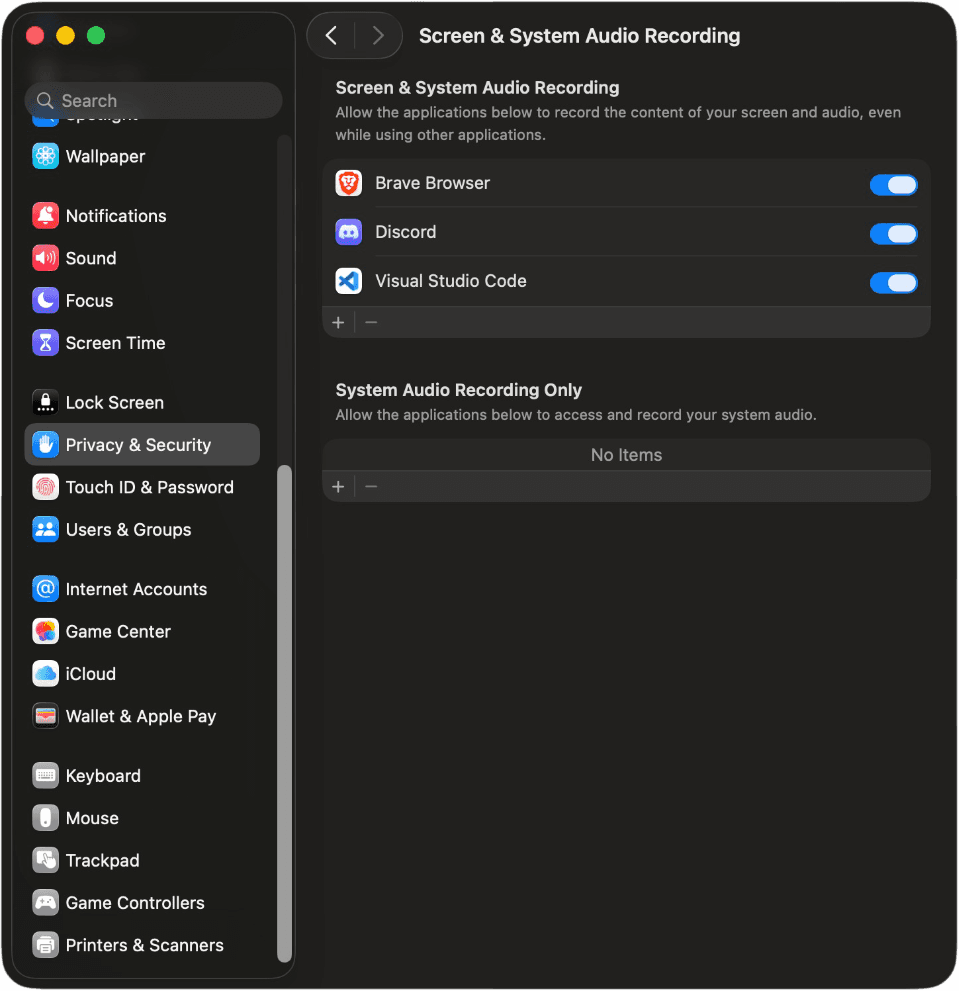
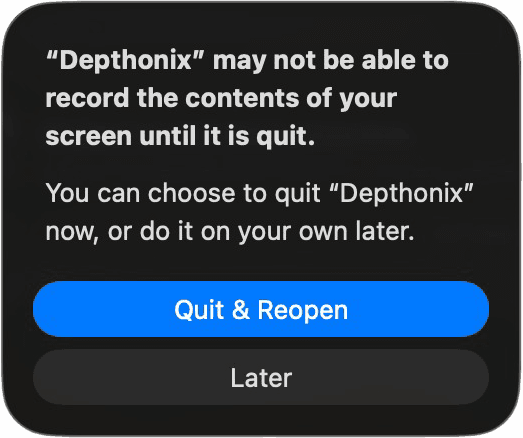
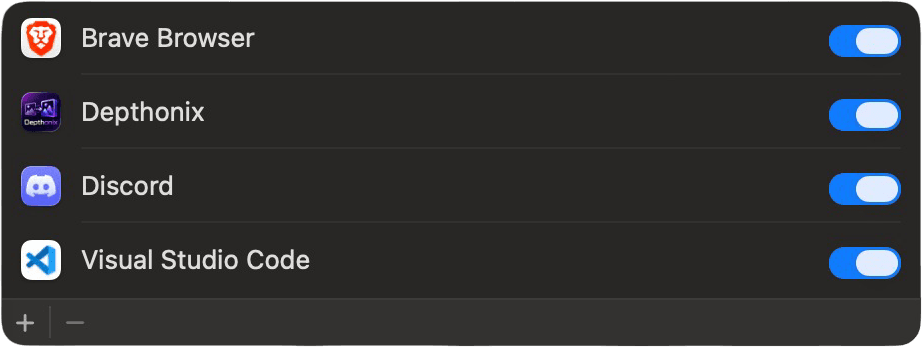
Depthonix reads the screen purely to generate the 3D image on your device. Screen content is never recorded, stored, or sent anywhere.
Reinstalling or updating to a new version? macOS may ask for Screen Recording permission again for the new build. If converting stops working after an update, just repeat the steps above — remove the old Depthonix from the list with the “–” button, add the new one, then Quit & Reopen.
How activation & your free trial work
The first time you sign in inside the app, it activates on that computer and your 7-day full-feature trial begins. A few things worth knowing:
Creating an account on the website doesn't start the clock. Your 7-day trial begins only when you first sign in and activate inside the app on your computer.
The trial is remembered by the computer itself — not only by your account. Each computer can run the 7-day free trial once.
If a computer has already used its trial, signing in with a brand-new account on that same computer puts you on the Free tier right away. A different email doesn't grant a second trial on the same machine.
A Full License is tied to your account, so it unlocks every feature on any computer you sign in to.
How to use
- 1Open Depthonix, sign in with your account and activate this machine — one account runs on one active device. Press the Start button, or open Settings → Account, to sign in.
- 2Connect your AR/XR glasses to your computer and switch them into their 3D mode (Full SBS or Half SBS) before you start — use Full SBS for the sharpest picture if your glasses support it.
- 3Pick the screen to convert and select the glasses display.
- 4Press Start — 3D appears on your glasses instantly.
- 5Adjust depth with the Soft → Extreme chips, or start from a one-tap Preset.
- 6Tune Performance Mode, frame rate and resolution in the Performance card for smoothness — if the machine runs hot or the picture isn't smooth, start by switching Performance Mode to Balanced or Efficient.
During the 7-day trial every feature is available. When the trial ends, your account moves to the Free Version, where you can convert for 5 minutes at a time with a 5-minute break in between. A full license removes the limit for unlimited use.
Know your screen
The macOS and Windows apps are laid out slightly differently, and the UI screenshots on this site are from the macOS version — the cards, names and controls work the same on both.
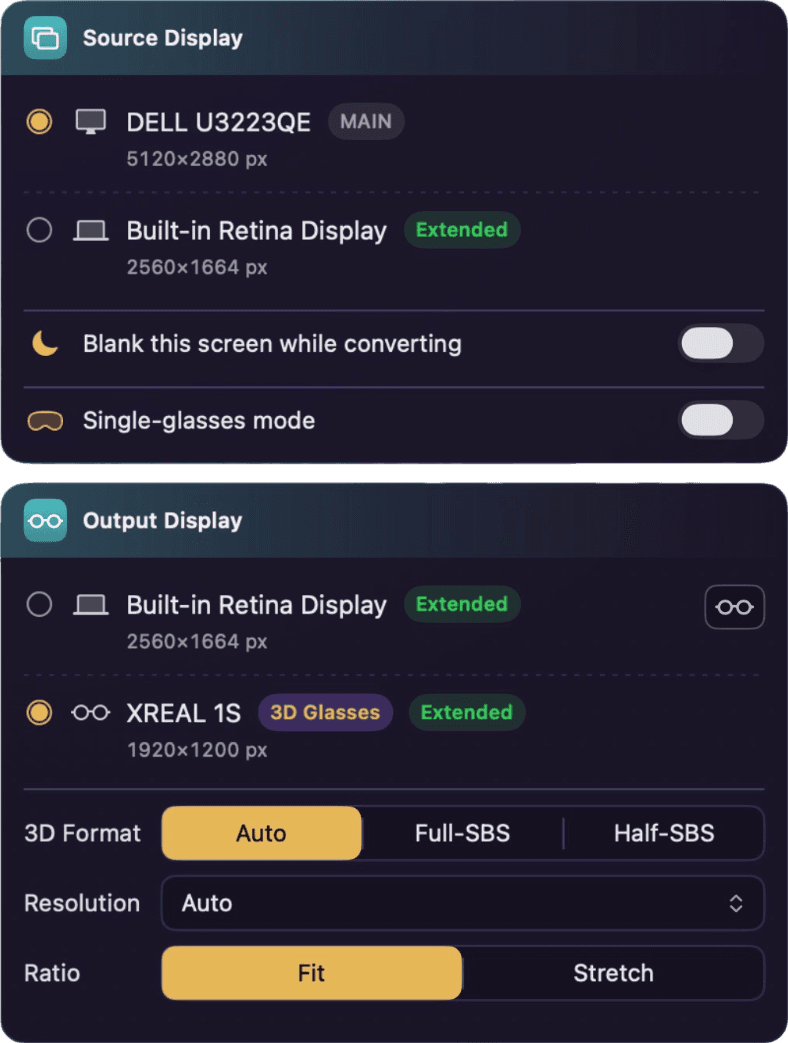
Source & output
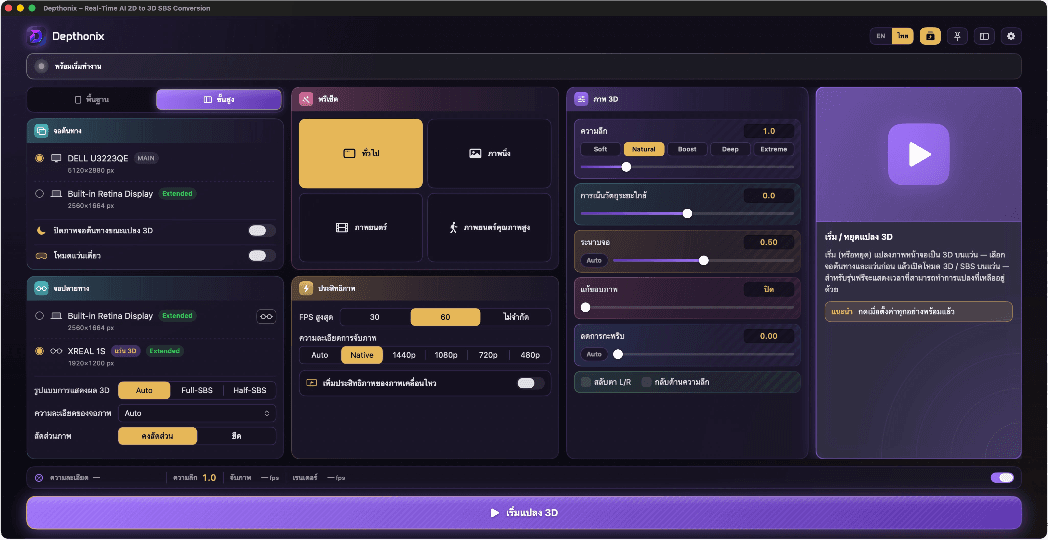
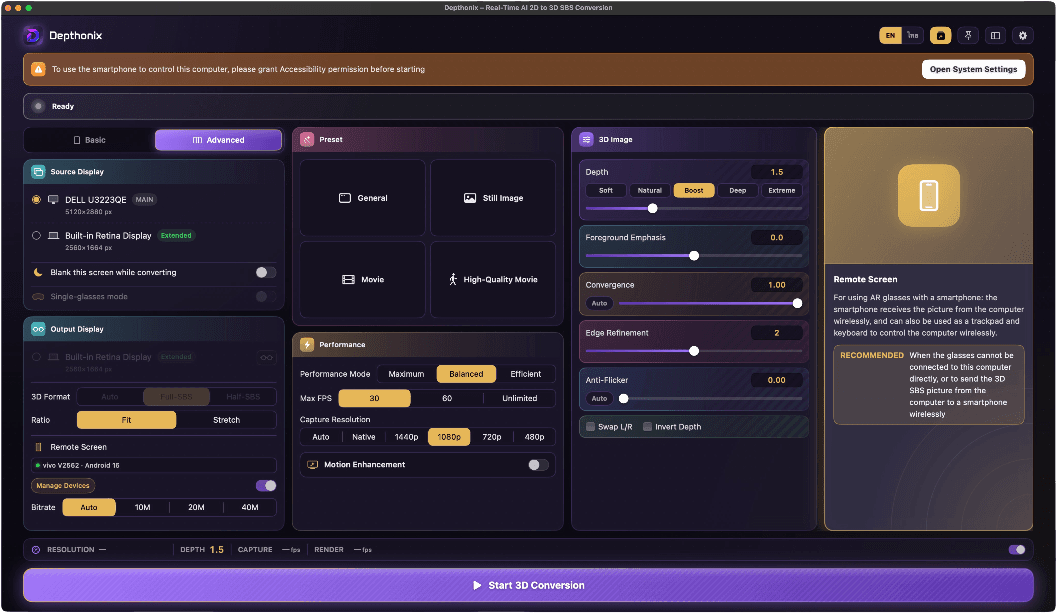
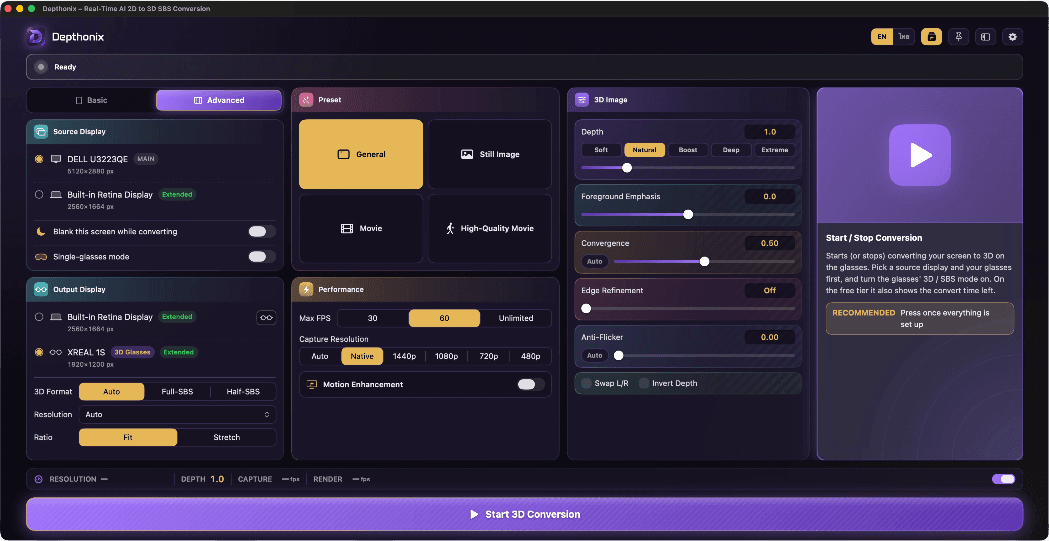
Your displays and glasses are auto-detected, each with its resolution — just tap to pick the source and the output. Choose the 3D format, plus a Resolution picker and a ratio option — along with the Blank-screen-while-converting feature, Single-glasses mode, and Remote Screen, which sends the 3D picture from the computer wirelessly to a smartphone with the AR/XR glasses connected.
Depthonix auto-detects most major AR/XR brands. If yours isn't picked up, tap the 👓 button next to it in the Output Display list to mark it as glasses yourself — your choice is remembered.
When you pick Half-SBS the app sets Ratio to Stretch automatically — the glasses expand the image back to the correct proportions. If the picture still doesn't fill the screen, check that Ratio is still on Stretch.
Turn on “Blank this screen while converting” in the Source Display card and the source screen turns black while you convert — the picture stays only in your glasses, so no one nearby can see what you're watching and the display isn't left glowing. On Windows this needs a one-time setup: the first time you turn it on, approve the permission prompt and restart the PC — after that it works every time. On macOS it works right away, no restart needed.
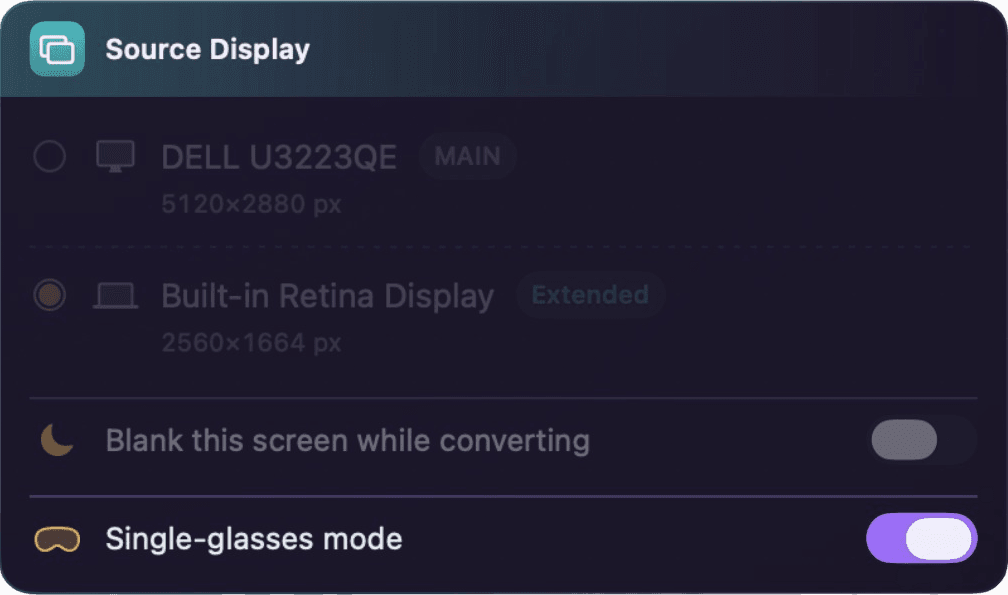
Single-glasses mode
Only have the glasses? No separate monitor needed — turn on Single-glasses mode and the glasses become both the source and the output: your desktop moves to a working screen shown inside the glasses, converted to 3D in real time.
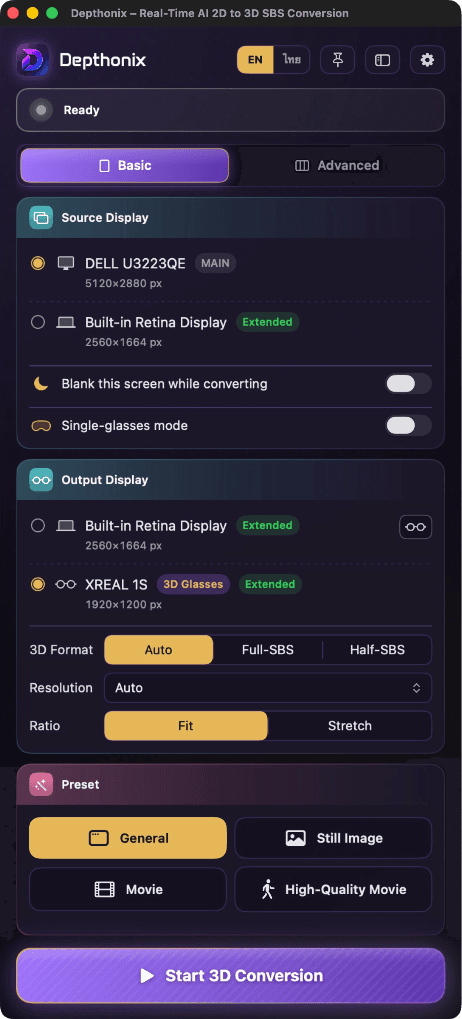
Basic & Advanced modes
Start simple: Basic mode shows just the essentials — pick your displays, choose a preset and press Start. Switch to Advanced anytime for the full control panel with every control.
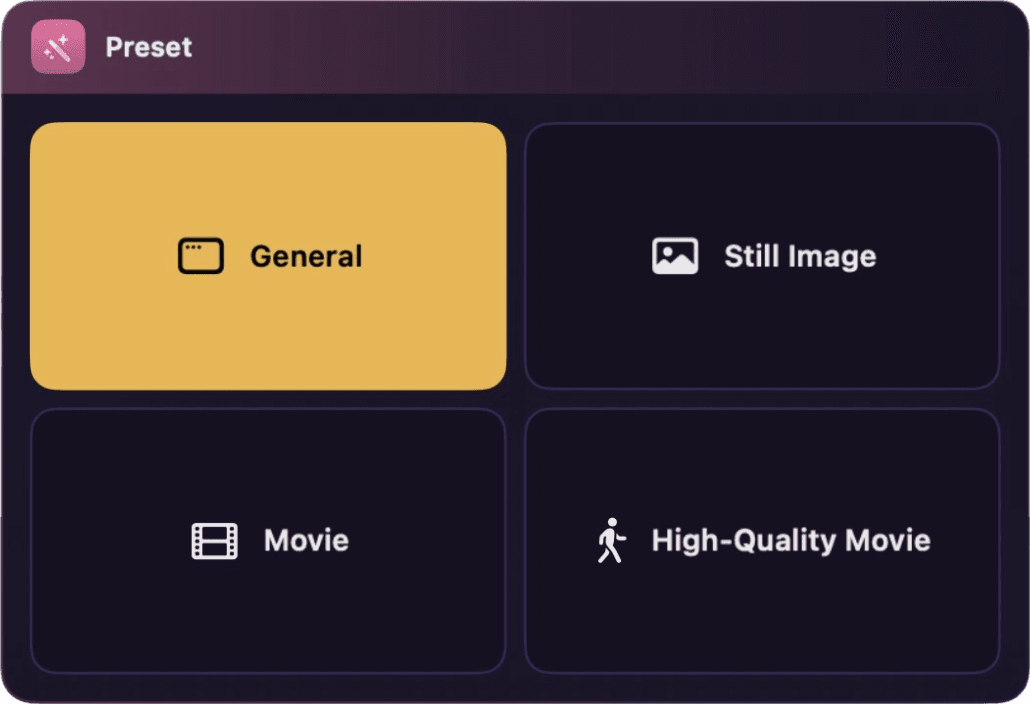
One-tap presets
Four scene presets — General, Still Image, Movie and High-Quality Movie — set depth, frame rate and the rest in a single tap, tuned for what you're watching.
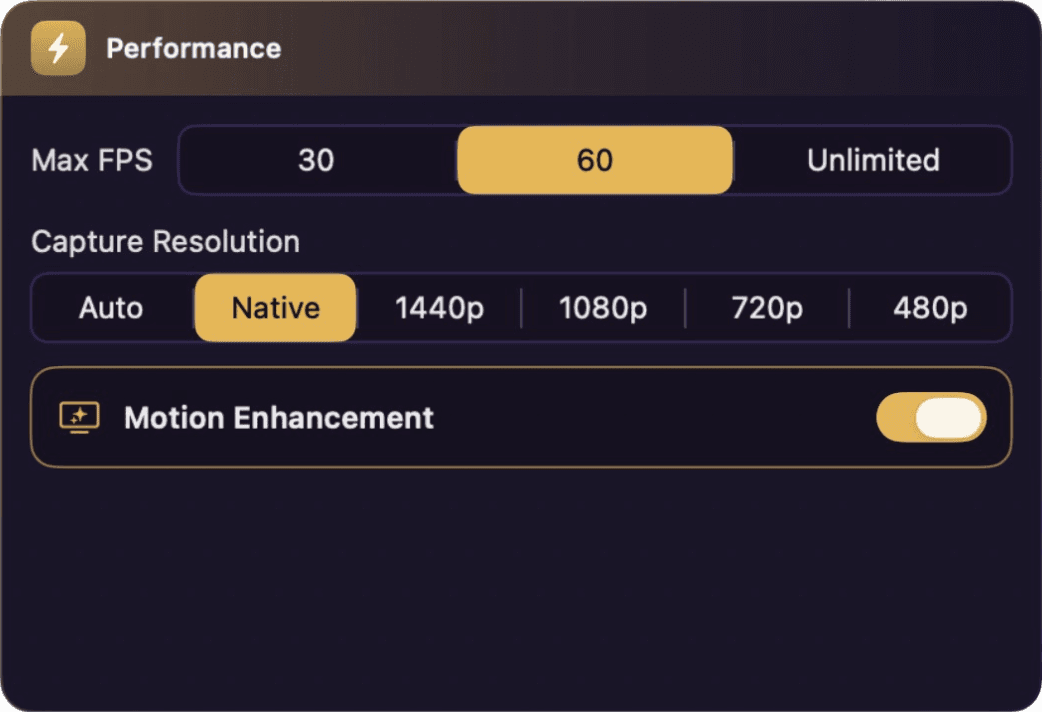
Performance controls
Choose from three Performance Mode levels to suit your machine's resources, and set the FPS ceiling and capture resolution you want — turn on Motion Enhancement for higher-quality 3D motion.
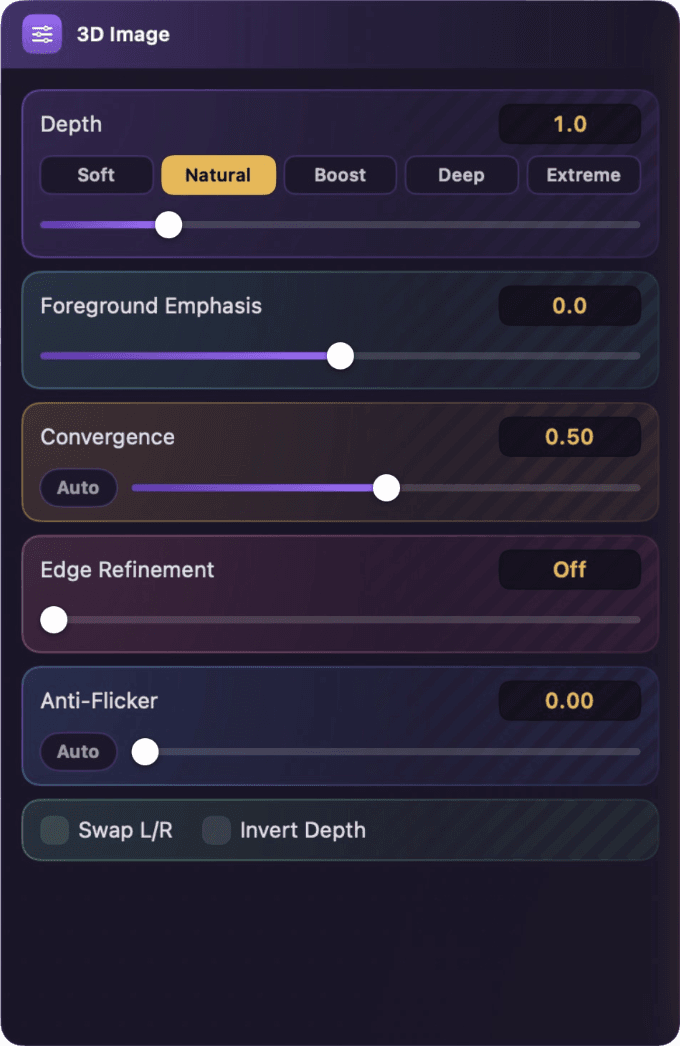
3D & depth
Dial Depth from Soft to Extreme, pull near subjects forward with Foreground Emphasis, set the screen-plane Convergence, sharpen outlines with Edge Refinement, and cut flicker with Anti-Flicker — Plus Swap L/R and Invert Depth toggles.

Live monitoring
Watch the Capture and Render fps live on the monitor strip at the bottom of the panel, alongside the current Depth level and the Capture resolution — so you always know how the conversion is running.
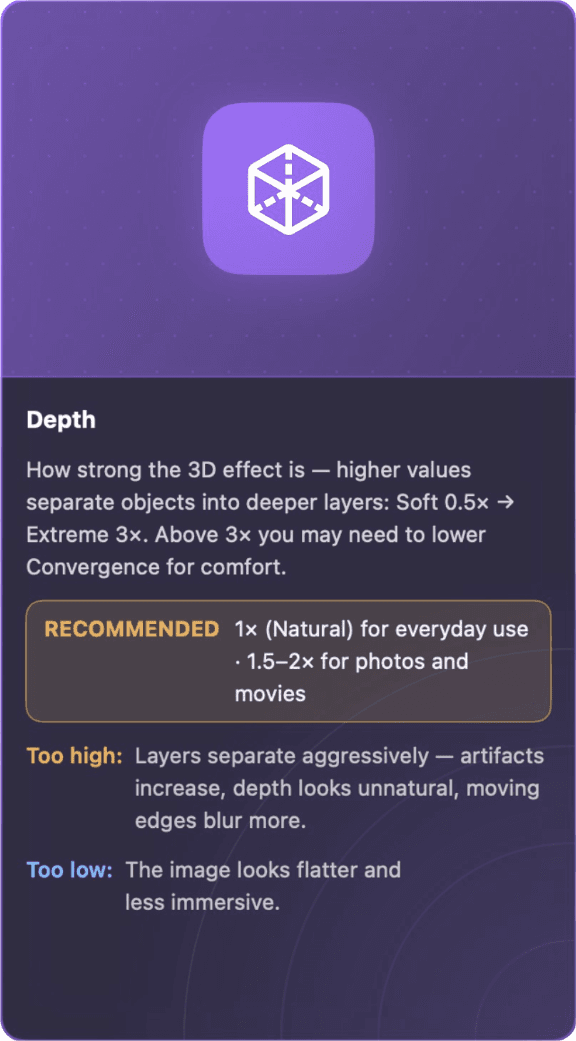
Guide Dialog
Want tips for tuning the app's settings? Press the Guide Dialog button and the guidance panel appears in Advanced mode — point at any control to see its setting tips.

Compact sidebar
Collapse the panel into a slim icon rail — reach every setting without covering your screen. It rotates to a horizontal bar too.
English & Thai
The entire interface is available in both English and Thai — switch languages anytime with a single click.
Single-glasses mode
Use Depthonix with just the glasses — no separate monitor needed. The mode runs at your glasses' native resolution for maximum smoothness and sharpness.
- 1Turn on “Single-glasses mode” in the Source Display card.
- 2Press the button on your glasses to enable 3D Mode / Full SBS, then press Start.
- 3Your desktop moves to a working screen shown in the glasses, and windows of other apps left open on other screens are moved along automatically.
- 4Stop converting to return to normal.
Requires glasses with a Full SBS (wide 3D) mode.
Remote Screen
Send the 3D picture and the sound from your computer to AR/XR glasses connected to an Android phone, over your Wi-Fi — no cable between the glasses and the computer. The phone doubles as a trackpad and keyboard for the computer, so you can sit anywhere in the room, as long as the Wi-Fi reaches.
What you need
An Android phone (Android 10 or newer) whose USB-C port supports video output (DisplayPort Alt Mode) — the same requirement as using the glasses with the phone on its own.
The computer and the smartphone must be on the same Wi-Fi network — 5 GHz recommended for the most stable connection.
The Depthonix Remote app (APK) installed on the smartphone — get it from the download page. The first time, Android may ask you to allow installing apps from unknown sources — confirm to allow.
The Android app (APK) is on the download page, next to the macOS and Windows installers — install it on the smartphone the glasses are connected to.
Pairing and starting
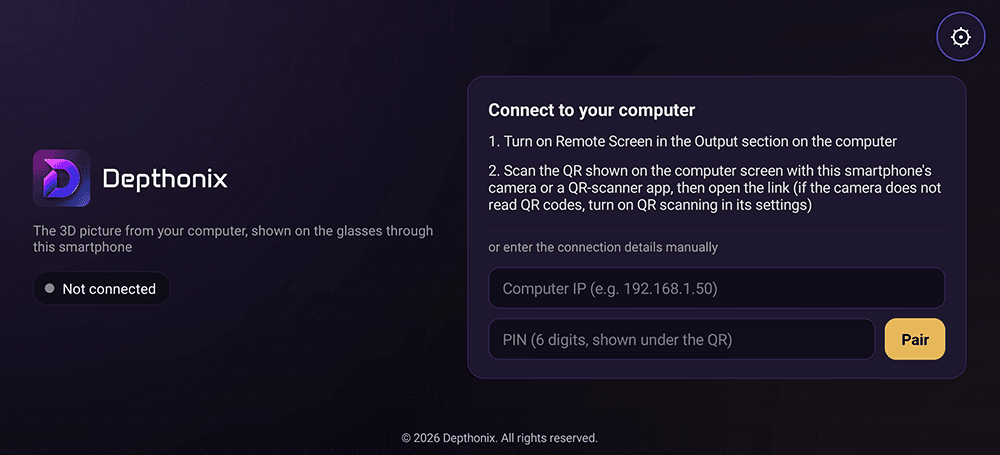
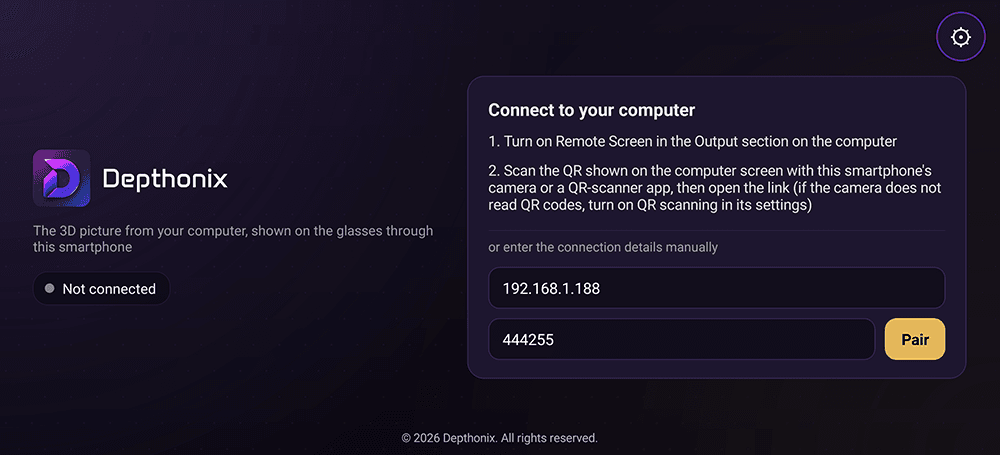
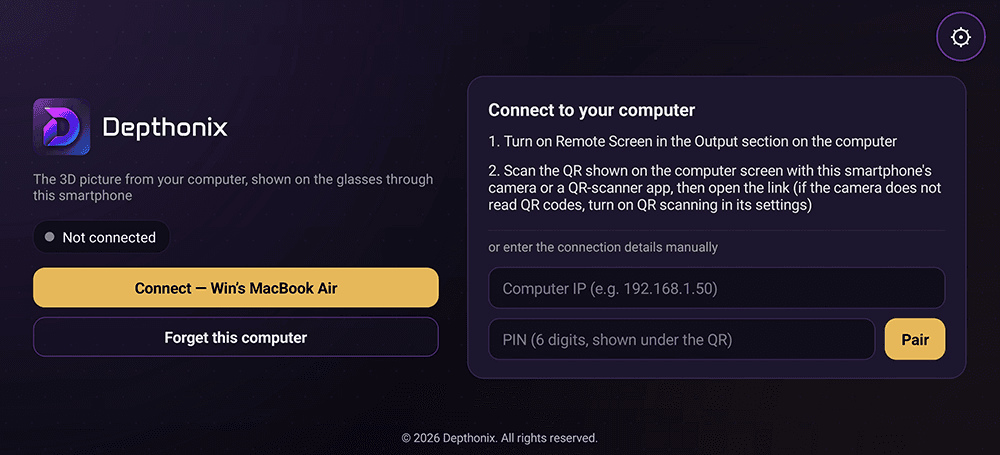
- 1Install the Depthonix Remote app on your smartphone and open it. The first screen is the pairing screen — it shows “Not connected” and a “Connect to your computer” card.
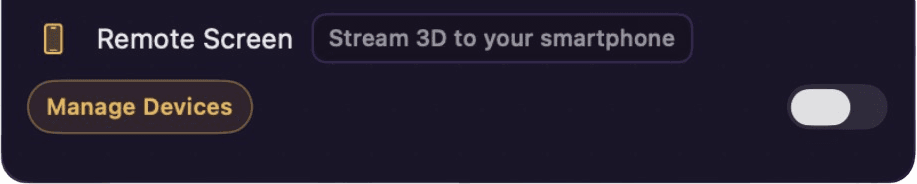
- 2On the computer, open Depthonix, sign in, and turn on the “Remote Screen” switch (Stream 3D to your smartphone) in the Output Display card. The “Manage Devices” button opens a window for managing the list of paired smartphones.
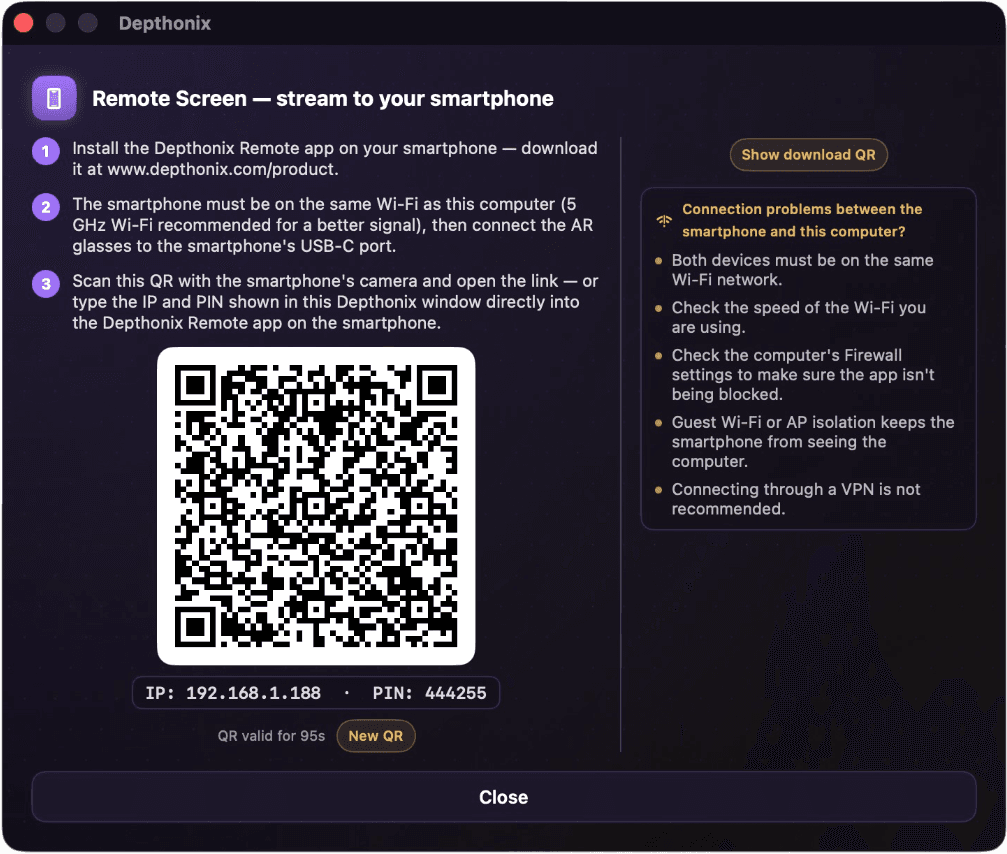
- 3The “Remote Screen” window appears with a QR; the IP and a 6-digit PIN are shown underneath (the QR is valid for about 2 minutes — press “New QR” when it expires). Scan the QR with the smartphone's camera (or any QR-scanner app) and open the link that appears — the Depthonix Remote app on the smartphone opens by itself.
- 4Or enter the connection details manually: type the computer's IP and the 6-digit PIN shown under the QR into the fields in the app on the smartphone, then press “Pair”.
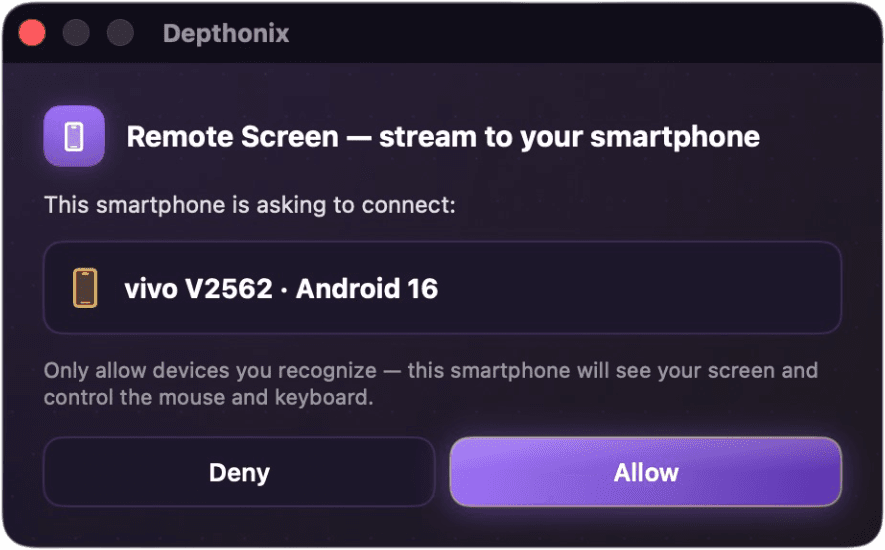
- 5The computer shows a “This smartphone is asking to connect:” window with the smartphone's model — press “Allow” only for a device you recognize, because this smartphone will see your screen and control your mouse and keyboard (press “Deny” if it isn't yours).
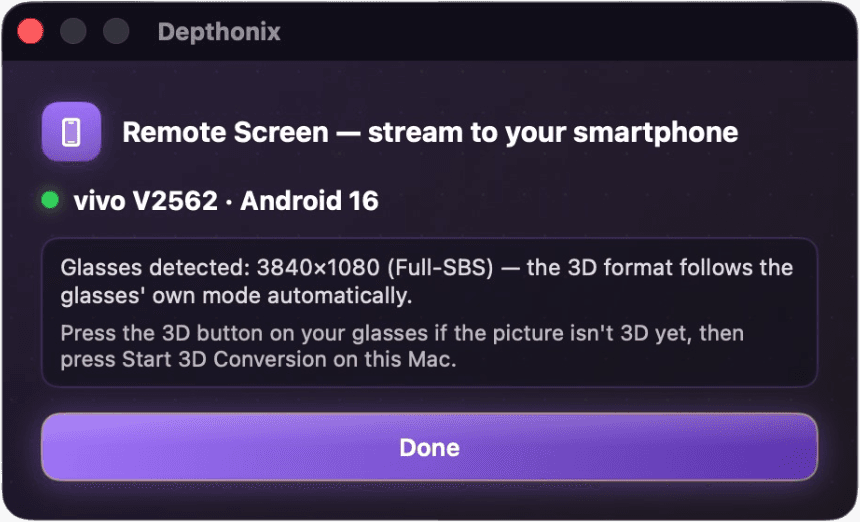
- 6Once paired, the window shows a green dot with the smartphone's name and the message “Glasses detected” — the 3D format follows the glasses' own mode automatically. If the picture isn't 3D yet, press the button that switches the glasses into 3D mode first, then press “Done”.
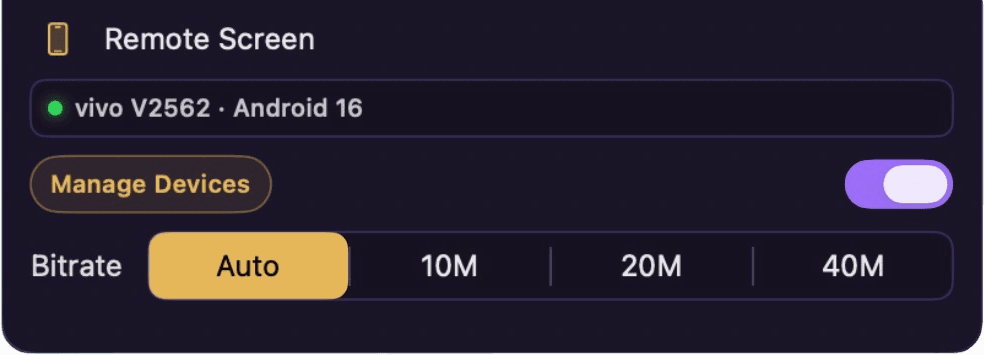
- 7The Remote Screen row in the Output Display card now shows the smartphone's name with a green dot, plus a Bitrate picker (Auto / 10M / 20M / 40M) — Auto is recommended. From now on this smartphone reconnects by itself, no QR needed.
- 8The first time, a banner says “To use the smartphone to control this computer, please grant Accessibility permission before starting” — press “Open System Settings” and switch Depthonix on under Privacy & Security → Accessibility.
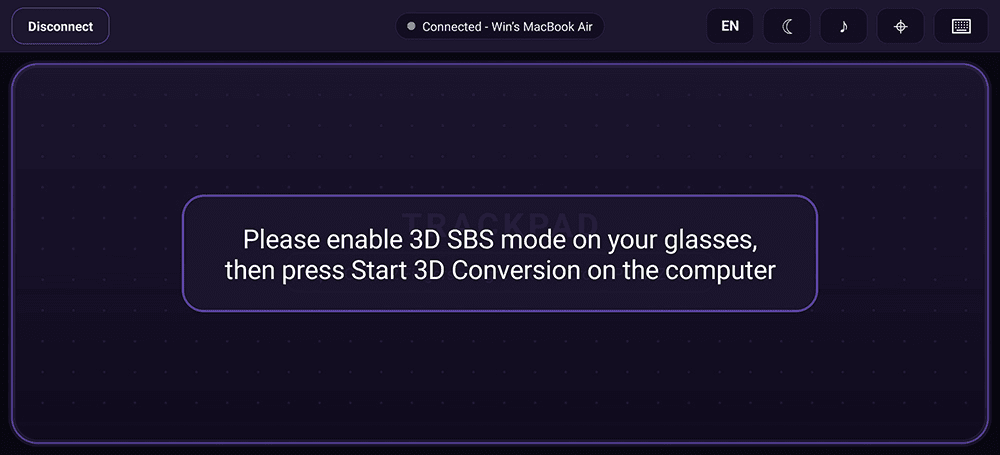
- 9Until you press Start, the smartphone screen is a trackpad with the message “Please enable 3D SBS mode on your glasses, then press Start 3D Conversion on the computer” — switch the glasses to 3D SBS first; nothing is streamed until you start conversion on the computer.
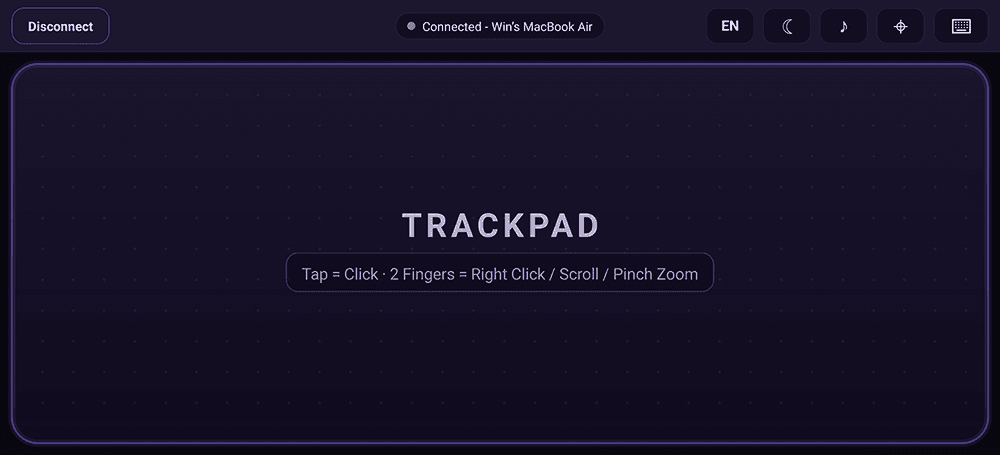
- 10Once conversion starts, the 3D picture and the computer's sound appear in the glasses and the smartphone screen is a full-screen trackpad. The top bar has the “Disconnect” button (left), the “Connected” status with the computer's name (centre), and the button cluster on the right: Language (EN / ไทย), Screen off (☾), Audio sync (♪), Re-center pointer (⌖) and Keyboard (⌨) — each is described in the next section.
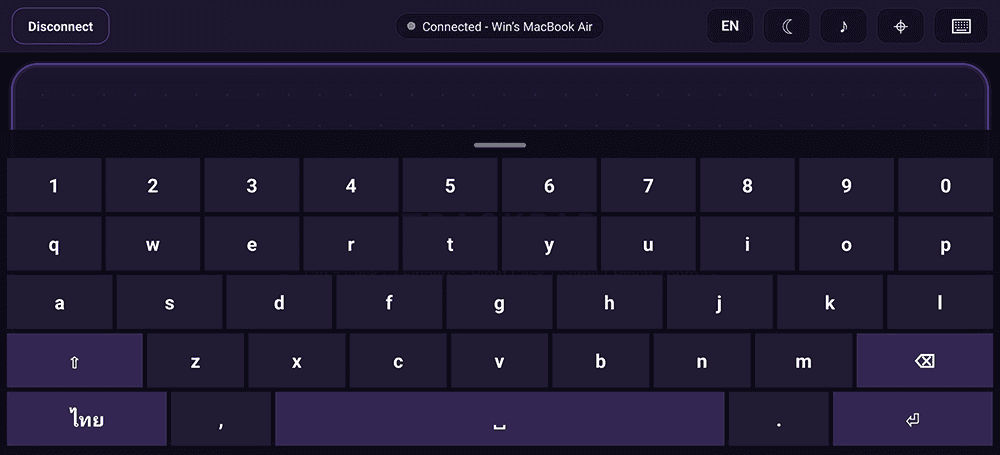
- 11Tap the keyboard button at the top right to open the built-in keyboard. Its “ไทย / ENG” key switches the language — Thai types correctly even when the computer's keyboard layout is English. Drag the handle at the top of the keyboard to change its height, and tap the keyboard button again to hide it.
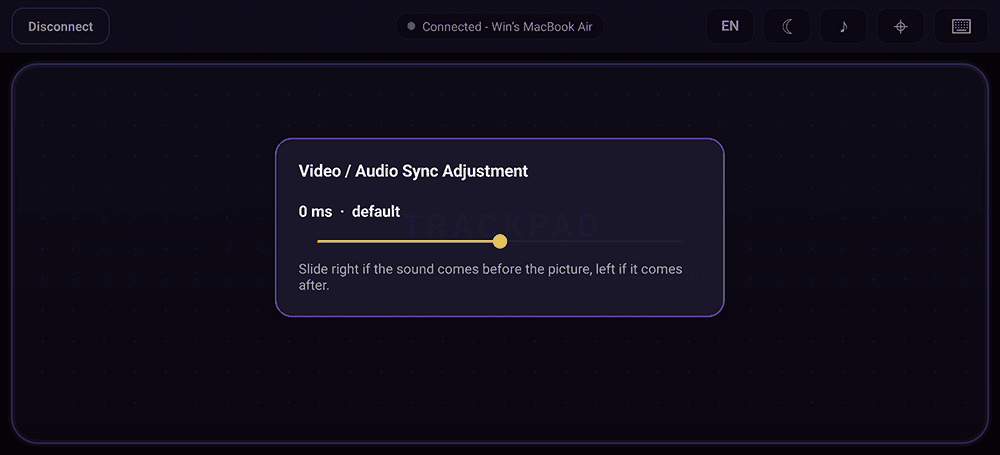
- 12Tap the ♪ button in the top bar to open “Video / Audio Sync Adjustment”. The default is 0 ms — slide right if the sound arrives before the picture, left if it comes after (tap outside the card to close it). The phone remembers the setting.
- 13The next time you open the app, the pairing screen already remembers the computer: press “Connect — <computer name>” to reconnect right away, no QR needed. “Forget this computer” (it asks you to confirm) removes the pairing — use it when the computer's IP address has changed (a different Wi-Fi network, or a new IP from the router): press Forget, then pair again with the QR or the IP + PIN.
The phone screen while streaming
The phone locks to landscape and works as a trackpad. Along the top bar, from left to right:
Ends the session and returns to the pairing screen. The pairing itself is kept.
The connection state, e.g. “Connected” with the computer's name.
Switches the app's language on the spot — the same setting as Settings → Language.
Blacks out the phone screen while the glasses keep playing — less glare, less battery. Tap the screen to bring it back. Don't use the phone's real power button: that switches the glasses off too.
Opens the Video / Audio Sync Adjustment slider (default 0 ms): slide right if the sound comes before the picture, left if it comes after.
Moves the mouse pointer to the exact centre of the computer screen — handy when you've lost track of it.
Opens the built-in keyboard with an ENG / ไทย key — Thai types correctly even when the computer's keyboard layout is English. Drag its top edge to resize it.
Trackpad gestures
Move the pointer · tap = click · double-tap, hold and move = drag
Tap = right click · drag = scroll · pinch = zoom in / out
Good to know
Streaming begins only when you press Start on the computer — until then a paired phone shows a waiting card, and Stop returns it there without dropping the pairing.
Each time Remote Screen is switched on, the app sets Max FPS to 30 and Capture Resolution to 1080p for a smooth, stable stream. You can change both afterwards in the Performance card, but higher values cost more Wi-Fi bandwidth and battery.
Use Full SBS if your glasses support it — in Half SBS each eye gets half the horizontal resolution, and the app shows a reminder once per session.
Unplugging the glasses, or the glasses switching 3D mode, pauses the stream for a moment; it resumes by itself when the display comes back.
While Remote Screen is on, the Output Display list and Single-glasses mode are disabled (the phone is the destination), and the menu-bar icon shows a streaming indicator the whole time the screen is being sent.
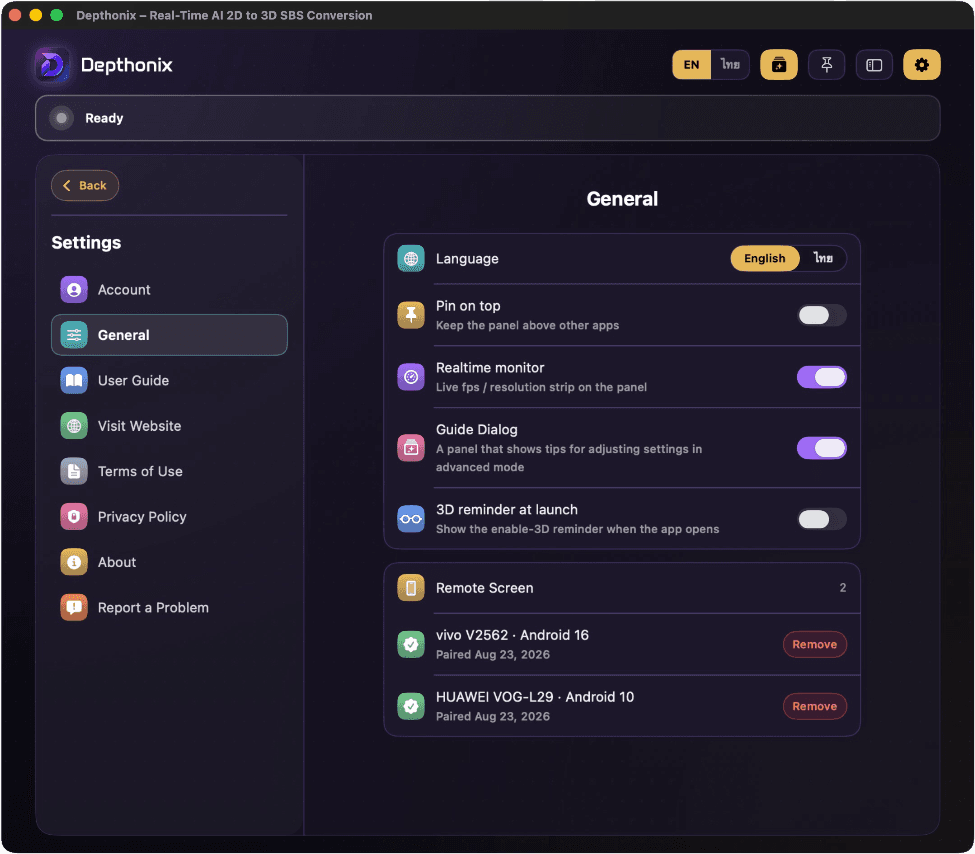
Paired phones are listed in Settings → General, where you can remove one at any time. Two phones of the same model are told apart by a short code after the name.
While the computer is converting to 3D, mouse control may feel a little laggy, depending on the computer's specs — for control, we recommend the trackpad on the smartphone, which feels smoother.
Settings guide
What each setting does, the values we recommend, and what happens when you push it too far either way.
Convergence, Anti-Flicker and Capture resolution each have an Auto option. Convergence and Anti-Flicker adjust themselves in real time, and Capture resolution's Auto picks the resolution that matches your glasses — leaving them on is the easiest way to get great 3D.
Depth
How strong the 3D effect is — higher values separate objects into deeper layers: Soft 0.5× → Extreme 3×. Above 3× you may need to lower Convergence for comfort.
Foreground Emphasis
Pushes near subjects further forward (or, with negative values, eases them back) relative to the background — extra pop for people and objects close to the camera.
Convergence
Where the scene sits relative to the screen plane — higher values place the scene behind the screen and make the depth feel stronger; lower values pull the scene toward you and make the depth feel shallower.
Edge Refinement
Cleans up the depth around object outlines so edges look crisp instead of haloed or smeared.
Anti-Flicker
Keeps the depth calm and steady while the picture isn't moving much.
Performance Mode
How much processing the 3D conversion uses. Maximum gives the finest depth detail. Balanced and Efficient use progressively less of the machine's resources and help it run cooler, while the depth of small details and the quality of object edges drop slightly.
Max FPS
Caps how many frames per second are shown on the glasses.
Capture Resolution
How sharp the captured picture is before it becomes 3D. Native is sharpest — but a very high native resolution costs more to process. Auto picks the resolution that matches each model of glasses, so nothing is processed beyond what the glasses can show.
Motion Enhancement
Gives subjects cleaner edges in moving pictures, especially when the subject moves quickly or the camera pans. Turning this option on uses more of your machine's resources.
Guide Dialog
The Guide Dialog is a guidance panel that appears beside the control panel in Advanced mode. Turn it on with the Guide Dialog button at the top right of the panel, or in Settings → General. While it's on, point your mouse at any control and the panel explains it — what the setting does, the value we recommend, and what happens when it's set too high or too low. The same guidance as the Settings guide on this page, right inside the app.
Additional menu
The five shortcut buttons at the top right of the control panel, from left to right:

Switches the entire interface between English and Thai.
Toggles the Guide Dialog panel in Advanced mode — setting tips for the control under your mouse pointer.
Keeps the panel above all other windows so it's never covered while you work — tap again to unpin.
Collapses the panel into the compact icon sidebar so it stays out of your way — see “Know your screen” above.
Opens the in-app Settings — your account & sign-in, general options, website links, About and Report a Problem (see the Settings section below).
The compact sidebar
Collapsing the panel gives you this icon bar (it rotates between vertical and horizontal). From left to right — the middle icons open each card as a small popover:
Settings
Press the Settings button at the top right of the panel to open the in-app Settings:
Reading the Monitor strip
The monitor strip at the bottom of the panel (Advanced mode) shows four realtime values — Resolution, Depth, Capture and Render — with an on/off switch at the right end. You can also turn it on or off in Settings → General (Realtime monitor).
The picture size currently being captured, following your capture-resolution setting.
The depth level currently in effect — it mirrors your Depth slider.
Frames per second grabbed from the source screen. When nothing on screen is moving it shows “Idle” instead of a number — that's normal, not a problem.
How smoothly the 3D image redraws on the glasses — the main number to watch. If the fps stays too low, switch Performance Mode to Balanced or Efficient first, then lower Max fps or the capture resolution.
Moving to a new computer
One account runs on one active device at a time, but you can move between machines as often as you like — your trial days and license follow your account.
- 1Install Depthonix on the new computer (see Installation above) and sign in with the same account.
- 2If the old machine is still active, the app asks you to confirm — press “Use on this device” and the new machine takes over right away.
- 3The old machine stops converting within a few minutes. You can also deactivate a device anytime from Profile → “Your Device” on this website.
Moving devices never resets your trial days.
Application updates
Every time it launches, Depthonix quietly checks whether a newer version is available. When there is one, a window pops up showing the new version number, with an Update button — or a button that opens the download page. You can also check anytime yourself — open Settings → About in the app and press “Check for Update”.
On macOS, the system may ask for the Screen Recording permission again after you install an update. See how to grant it in the section above
On Windows, a User Account Control (UAC) window may appear while the update installs — press Yes to continue.
Reporting a problem
Ran into something — no 3D picture, a black screen, the app misbehaving, an account or payment issue? There are two ways to reach the team.
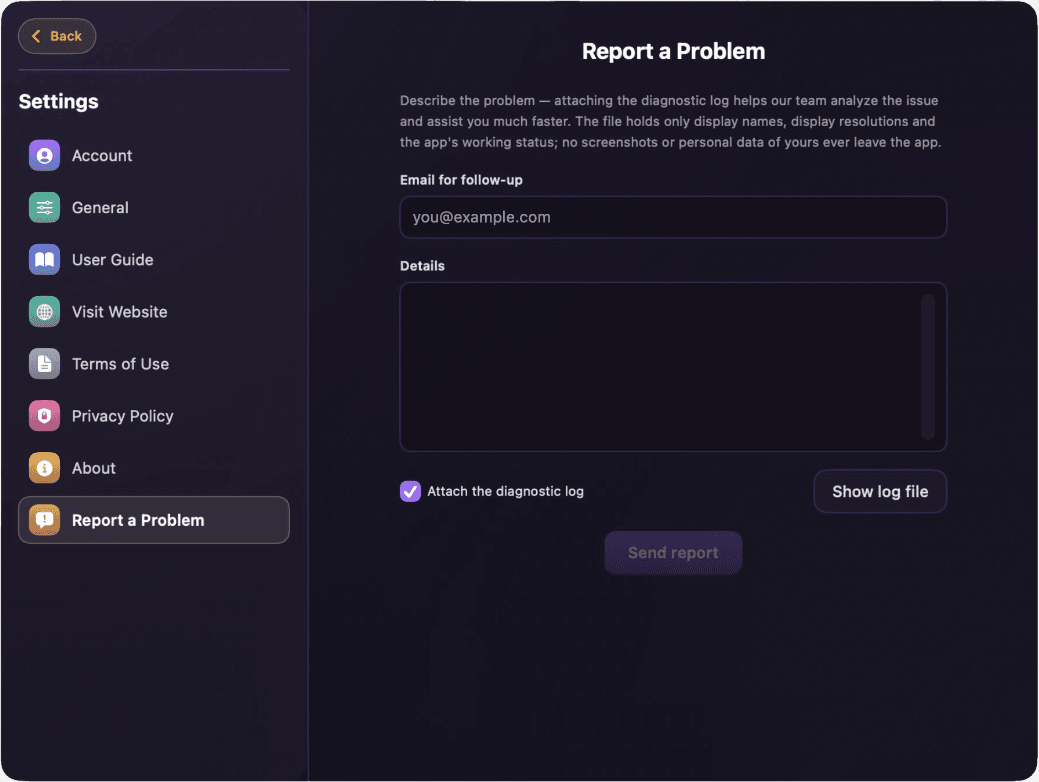
Open Settings → Report a Problem, enter a contact email, describe what happened, and optionally attach the app's log file — the log lets the team see the exact working conditions when the problem occurred and diagnose it much faster. It contains only display names, resolutions, and the app's pipeline status — never screenshots or any personal data. This channel works even when you're not signed in.
Best for account or payment issues, or when the app won't open at all — fill in the form on the Contact page and pick the category that matches (usage questions · glasses test reports · account · app · payment · other), or reach us by email and Facebook, both listed on that page.
Streaming services & protected content
Some online movie-streaming platforms deliberately block screen capture. When that happens, the video area shows as black in your glasses, while the rest of the screen can still be seen as usual — this is the service provider's own content protection.
- Netflix
- Disney+
- Amazon Prime Video
- Max (HBO)
- Apple TV+
- Paramount+
- TrueID, Monomax, Viu, WeTV, iQIYI
- Films rented or bought on YouTube
- Blu-ray playback software
- YouTube — ordinary videos
- Twitch, Facebook, Instagram, TikTok
- Video files on your computer (VLC, PotPlayer, QuickTime, mpv and the like)
- Your own Plex or Jellyfin library
- Games, apps and everything else on your desktop
Tips & notes
Small things that make a big difference to picture quality and comfort.
Your AR/XR glasses must support either a Full SBS or Half SBS viewing mode.
If your glasses support it, use Full SBS — each eye gets the full resolution, noticeably sharper than Half SBS (especially for text). Switch the glasses into their 3D mode first, and the app's Auto format will pick it up.
The app needs an internet connection while in use, for license verification and management.
For the smoothest experience, pair the glasses with your computer's main display only — leave extra monitors unplugged while using the app.
If your display runs at a scaled (non-native) resolution, the converted picture may not look as sharp as it would at the native resolution.
A very high-resolution source makes on-screen text tiny and hard to read through the glasses — pick a source display with a comfortable resolution, or lower its resolution before converting.
Depth looks best between 1× and 3× — higher values can distort the depth and create artifacts or blur around people and objects.
The same settings can give different results on different machines — it depends on your hardware, the resolutions of the source and output displays, and each person's eyes. Tune gradually until it feels right for you.
Smoothness (render fps) also depends on your computer's specs — pushing every setting past what the machine can handle may cause stuttering. Switch Performance Mode to Balanced or Efficient, or dial the other settings down. A machine that gets very hot also lowers its own processing power, which can make the picture stutter too.
If you run into a problem with the app — such as conversion not starting, or your account status not updating — the first fix is to quit the app and reopen it. If the app still isn't usable, contact us at support@depthonix.com.